

Long Exposure during the Day - A Guide
In my photography courses, the question of how to take soft and flowing pictures of water, blur clouds or achieve the well-known smooth effect with long exposures comes up again and again. Such images are created through extended exposure times. In this step-by-step guide, you will learn how to take impressive long exposures in daylight.
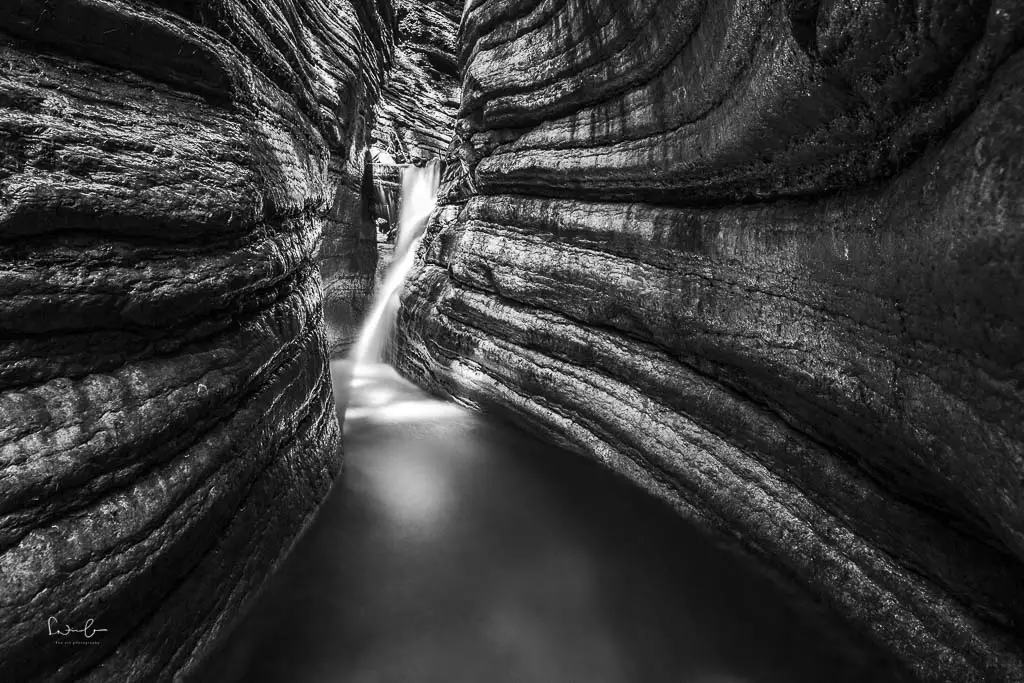
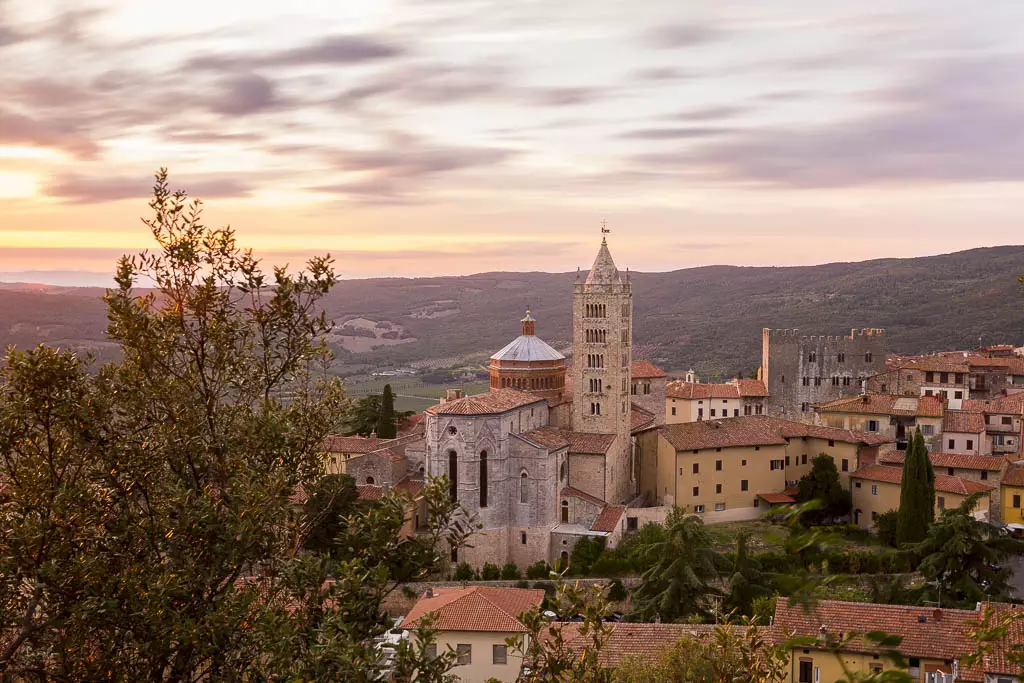
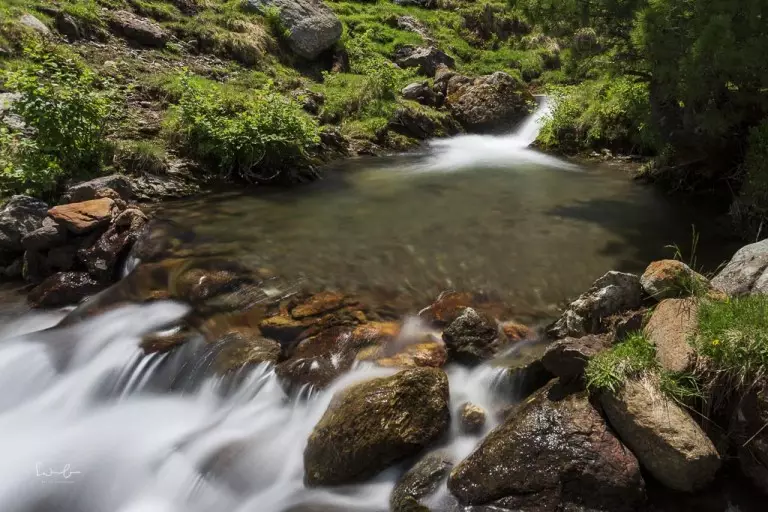
f/7.1 | 20 sec | 16 mm | ISO 100 | ND 1000
1. The Basics of Exposure Time
Before we delve deeper into long exposure, let's take a look at the basics of exposure time.
What does Exposure Time mean?
Exposure time, also known as shutter speed, is the length of time it takes for light to pass through the lens onto the camera sensor. The longer the shutter is open, the more light is captured. This is particularly important in darker environments, whereas a short exposure time is sufficient in bright daylight.
The exposure time is usually displayed in fractions of a second:

How does the exposure time affect the image?
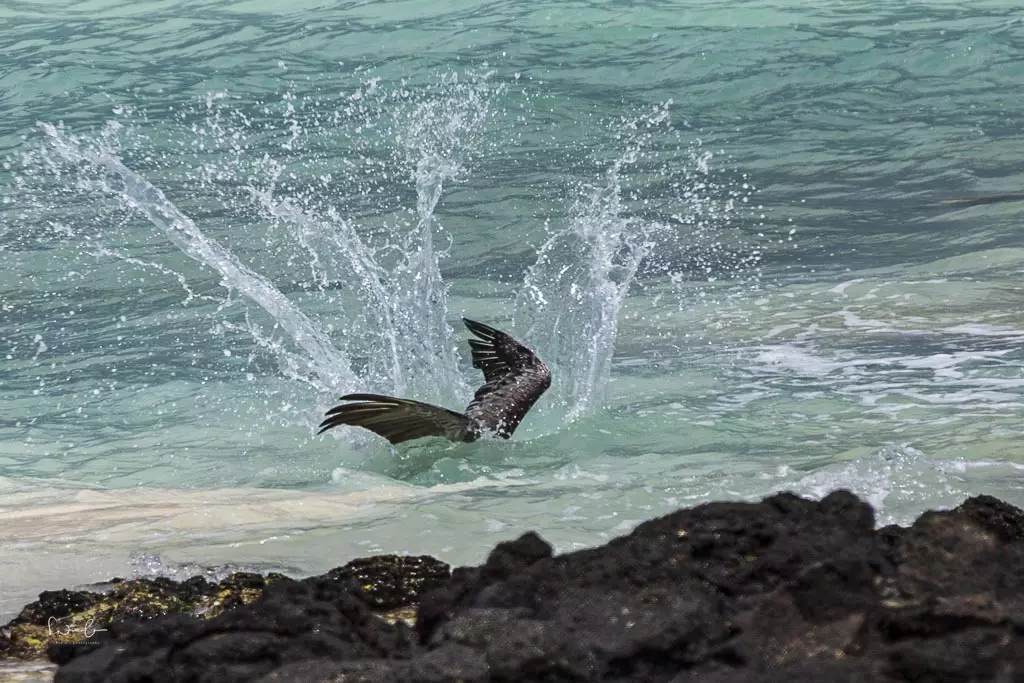
Short exposure times (e.g. 1/250 second) freeze movements and make subjects appear razor-sharp. With extremely short times (e.g. 1/2000 second), even individual drops of water in flight can be captured.
Longer exposure times (e.g. 1/15 second) result in moving objects becoming blurred, while static elements remain sharp. This opens up creative design possibilities - such as blurred crowds or soft water movements. With very long exposure times (from 2 seconds), water can look like a smooth veil in photos.
f/5.6 | 1/500 sec | 200 mm | ISO 100
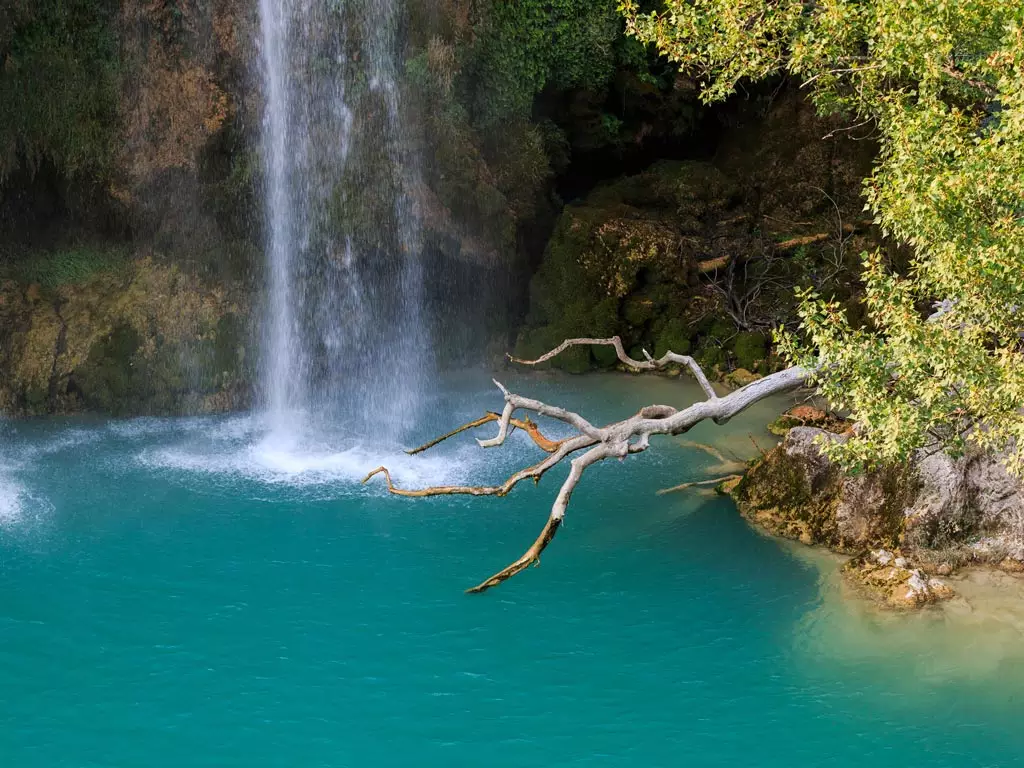
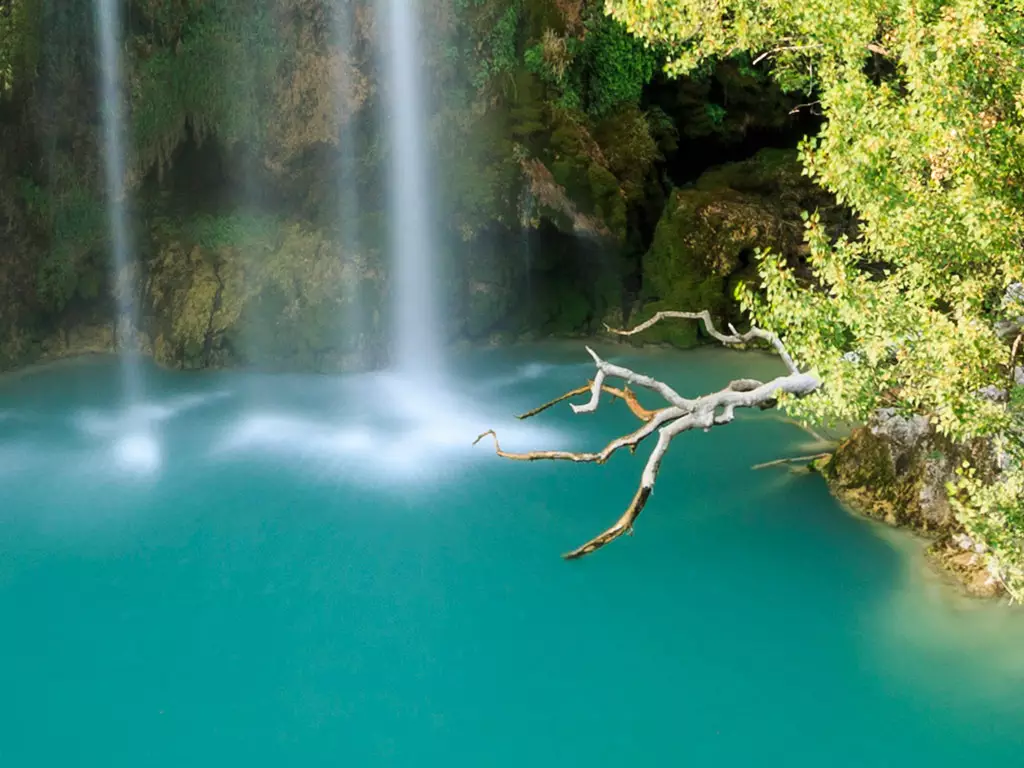
The exposure time is decisive for the image composition, not only for people but also for water. A longer exposure time transforms water into a soft veil (e.g. 1/8) or smoothes it out completely (e.g. from 2s). The following example shows how the exposure time affects the appearance of a waterfall.
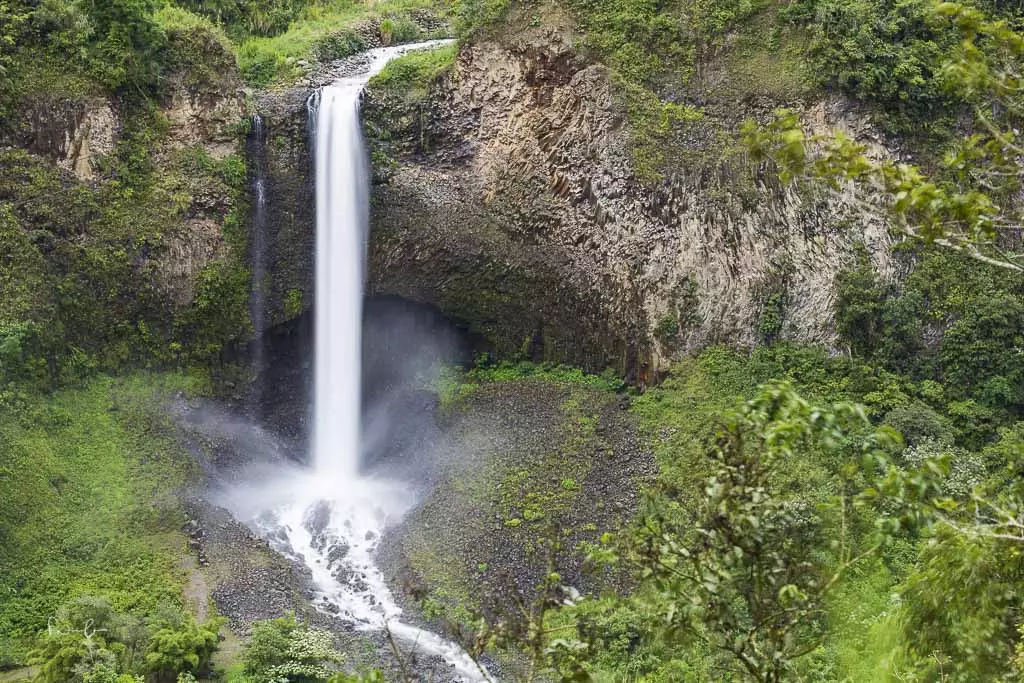
f/7.1 | 1.6 sec | 70 mm | ISO 100 | ND 64
2. Photographing with an ND filter
If you are working with long exposures, you will quickly realize that a lot of light hits the sensor. If you want to take a long exposure in daylight, you will encounter a problem without special equipment - the image will be overexposed and appear as a white spot. To avoid this, you need an ND filter, also known as a gray filter.
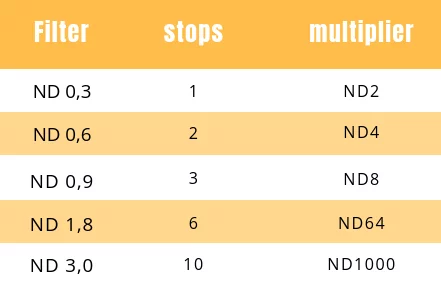
An ND filter has a uniformly dark tint and reduces the amount of light that reaches the sensor. This makes it possible to use longer exposure times despite bright daylight. ND filters are available in different strengths. Two values are usually indicated on the filters: the optical density and the factor for the exposure time extension.
The most common variants are ND8, ND64 and ND1000. An ND filter with a density of 3.0 darkens the image by 10 f-stops. This means that you can extend the exposure time by a thousand times compared to normal lighting conditions.
See for yourself the difference between short and long exposure times.
f/6.3 | 1/160 s | ISO 400 | 90 mm
f/6.3 | 2,5 s | ISO 100 | 19 mm
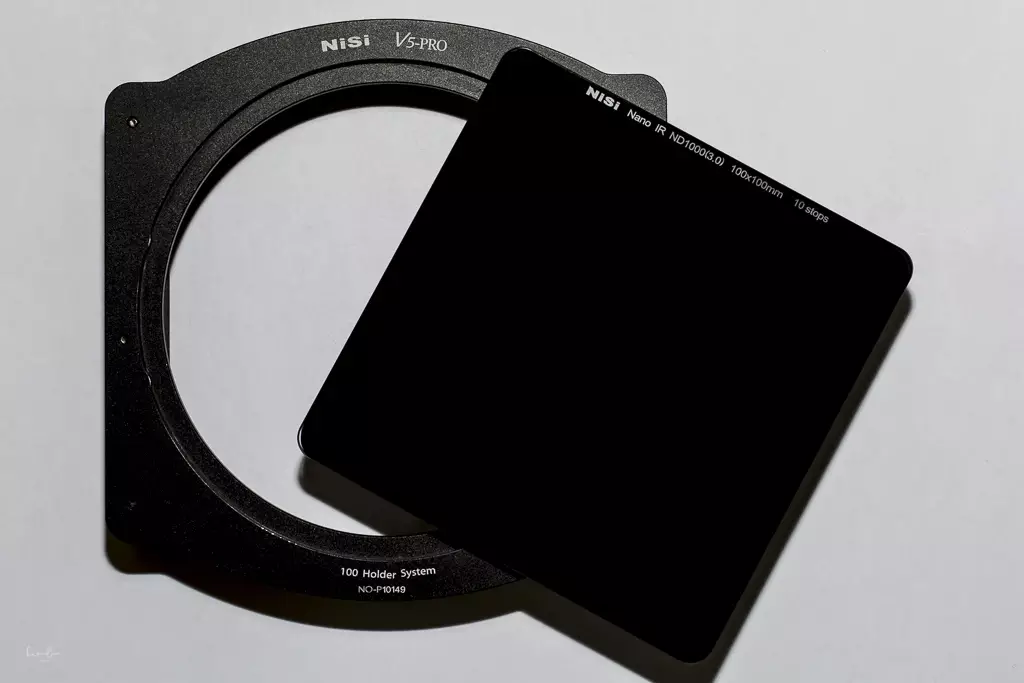
I recommend the NiSi filter system.
The filters in this system are made of high-quality glass and have a double nano-coating. The filter set is characterized by excellent workmanship and is perfect for high-quality photos.
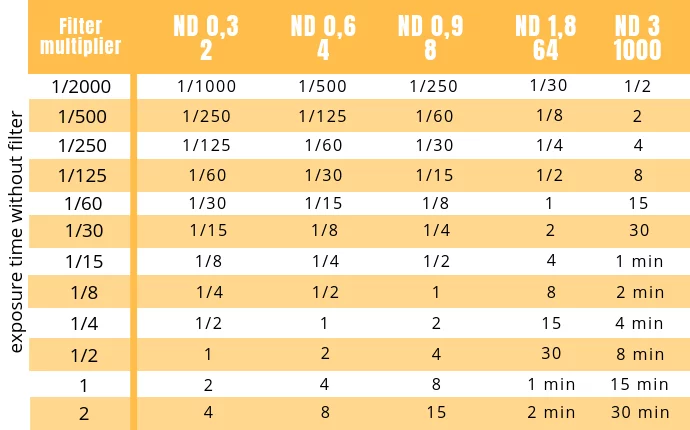
There are several methods you can use to determine the right exposure time when using an ND filter:
Use the Live View mode on your camera: This mode shows you a preview of the finished image so that you can see the effects of the exposure time in real time. Turn the control dial to adjust the exposure time and observe how the brightness changes. With certain Nikon models, you may need to activate the “Exposure Preview” to make these adjustments visible. You can find instructions in Derek's video
Calculate the exposure time with an app: There are many useful apps for iPhone and Android that help you determine the correct exposure time.
Use a table to determine the exposure time: There are tables that show you the corresponding exposure time for different ND filter strengths. (see below)
Calculate the exposure time using a simple formula: You multiply the initial exposure time by the factor of the filter used. For example: Without a filter, the exposure time is 1/10 second. If you use an ND 3.0 filter, which has a factor of 1000, then you multiply 1/10 second by 1000. This results in an exposure time of 100 seconds.
I personally prefer the Live View mode as a method (number 1) as it gives me quick and visual feedback on my settings.
3. Examples of Long Exposures in Daylight
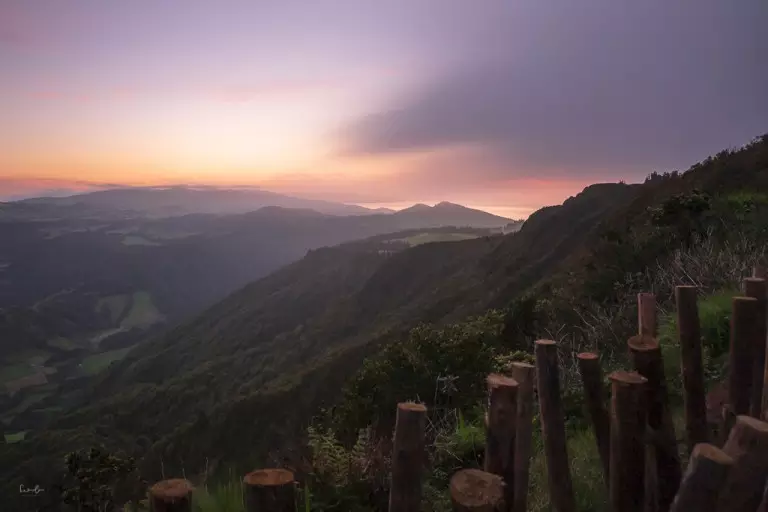
Blurred clouds and vivid colors at sunset
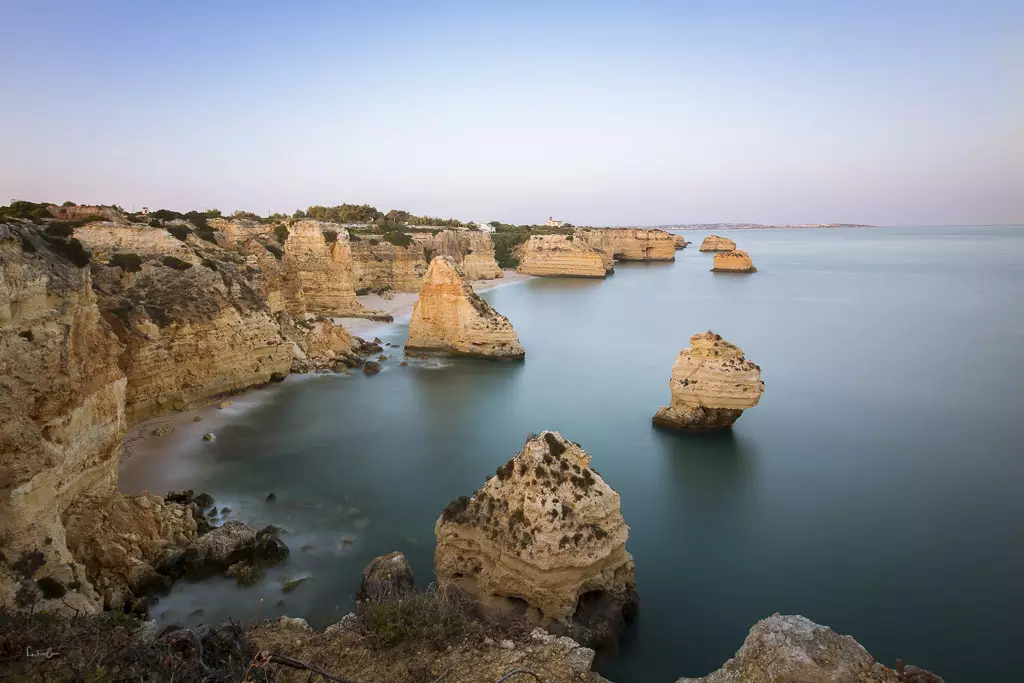
f/8 | 91 Sec. | 31 mm | ISO 100 | ND 1000
Extremely shallow water
f/10 | 68 Sec. | 17 mm | ISO 160 | ND 1000

Capturing movement and dynamics
f/6.3 | 6 Sec. | 35 mm | ISO 320 | ND 64

An almost picturesque effect of the water and the gondolier
f/7.1 | 2,5 Sec. | 84 mm | ISO 100 | ND 1000
Blurred clouds
f/9 | 25 Sec. | 19 mm | ISO 100 | ND 1000
4. Long Exposure with ND filter: step-by-step Instructions
In the following, I'll show you how I approach a long exposure with an ND filter. This step-by-step guide will help you find the right technique:
Step 1:
Mount your camera securely on the tripod and choose the best viewpoint for your subject. Make sure that the tripod is stable. If it's windy, you can hang your backpack on the hook of the tripod for extra stability. Look through the viewfinder and adjust the tripod so that you have the desired image section.
Step 2:
Set the mode dial to manual mode (M) and select the aperture you want to use for your shot. For landscape photography, it is recommended to choose an aperture between f/8 and f/13. If you still need help with manual exposure, I recommend my free photography training.
Step 3:
Set the shutter release to a 2-second. This time allows the camera and tripod to stabilize after the manual shutter release and minimizes camera shake. Alternatively, you can also use a remote shutter release.
Step 4:
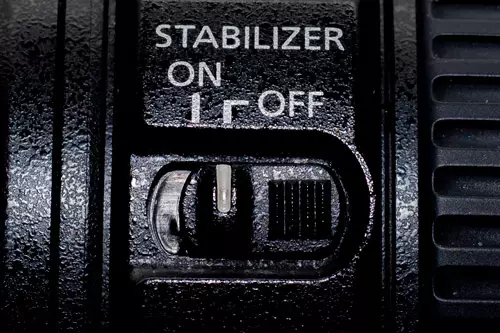
Deactivate the image stabilizer on your lens. The stabilizer is designed to compensate for camera shake, but this can lead to slight blurring when using a tripod.
Step 5:
If you are using an ND 3.0 filter that allows an exposure time of 1000x, it is advisable to activate the mirror lock-up function on SLR cameras.
Step 6:
Switch to Live View mode and set the focus to the desired point. For landscape shots, you usually focus on about a third of the image. As soon as you press the shutter release button halfway, the camera measures the exposure. Check the scale and adjust the exposure time until the arrow is at zero. This is the exposure time you would use without an ND filter for a correct exposure, provided the lighting conditions are normal and there are no large differences in brightness.

Step 7:
Screw the ND filter onto the lens. Nothing will be visible on the display at first. Adjust the exposure time until you can see your subject clearly and with the desired brightness. When you have reached the right brightness, release the shutter. With Nikon models, you may need to set the “Exposure Preview” to “ON”.
The Live View mode allows you to change the image section or adjust the focus even while using the ND filter. Experiment with different image sections and exposure times to achieve the best possible result.
f/5.6 | 5 Sec. | 20 mm | ISO 100 | ND 1000
5. Bulb Mode - Exposures longer than 30 seconds
If you take photos in the evening and use an ND filter, an exposure time of 30 seconds in manual mode may not be enough. Don't worry - 30 seconds is not the end of the possibilities. Bulb mode is available for longer exposure times. This is labelled ‘B’ on the scene selection dial. In bulb mode, the shutter remains open for as long as you hold down the shutter release button, which enables long exposures of several hours. To use bulb mode, however, you will need a remote control or a remote shutter release.
How to proceed step by step:
Step 1:
As with the previous methods, set up your camera on the tripod and choose the desired location for your subject.
Step 2:
Turn the dial to ‘B’ for Bulb mode and choose the aperture you want to shoot your subject at. Olympus cameras offer two options: ‘Live Bulb’ and ‘Live Time’. With ‘Live Bulb’ you hold down the shutter button for as long as you want, while with ‘Live Time’ the first press activates the shutter button and the second press stops the recording.
Step 3:
Set the shutter release to a 2-second delay to use a remote control or remote shutter release.
Step 4:
Deactivate the image stabiliser on your lens. The stabiliser compensates for camera shake, but in some cases it can cause blurring when shooting with a tripod.
Step 5:
As you are exposing for longer than 30 seconds, you should also activate the mirror lock-up function on SLR cameras to minimise vibrations.
Step 6:
Switch to Live View mode, switch to manual focus and set the focus point to the desired location. For landscape shots, you usually focus about a third of the way into the picture. Enlarge the image by tapping on the magnifying glass symbol with the ‘+’ and turn the focus ring until your subject is in focus. As soon as you press the shutter release button halfway, the camera measures the exposure. Check the scale and turn the exposure time until the arrow points to zero. This is the exposure time you would use for a correct exposure without an ND filter, assuming the lighting conditions are ‘normal’. Make sure not to change the focus afterwards.
Step 7:
Screw the ND filter onto the lens and calculate the exposure time using the helper methods described above. At the beginning, an app might be the easiest method. Memorise the calculated time. Then press the shutter button on the remote control and stop the time by releasing the shutter again when the calculated time has elapsed. You may need a few attempts to find the optimum exposure. Over time, however, you will develop a good feel for the exposure and may no longer need the app - you will then be able to set the time by feel.
f/10 | 203 Sec. | 23 mm | ISO 200 | ND 1000
Three more valuable tips for long exposures:
Very long exposure times can result in so-called hot pixels - small red or blue dots in your image. To avoid this, cover the viewfinder of your camera with the viewfinder cap, which is often attached to the camera strap. This prevents light from entering the camera through the viewfinder. In astrophotography, this problem is tackled by using so-called dark frames. To create a dark frame, cover the lens with the lens cap and expose it for the same amount of time as the actual shot. It is advisable to take three dark frames before and after the shot.
Many cameras offer a noise reduction function for long exposures. I personally deactivate this function, as the noise reduction process takes just as long as the actual exposure, which can take an unnecessarily long time.
Also note that grey filters, especially the ND 1000, can cause colour casts. However, I did not notice this when using the NiSi ND 1000. To correct possible colour distortions, it is advisable to shoot in RAW format so that you can adjust the colours in post-processing.
7. Long Exposure of People
Long exposure does not always mean that you have to expose for several seconds. An exposure time of around 1/15 of a second can already be considered a long exposure. For a person, an exposure time of 1/15 second is very short, but for the camera it represents a longer time. So if you photograph a moving person, they will appear blurred in the picture.
Long exposure times are particularly suitable for capturing the dynamics of people. If you are photographing a striking building, it can be very exciting to capture blurred people on it. In urban areas in particular, the movement of people in combination with static architecture can create interesting, dynamic images.
Would you like to photograph a much-visited sight while travelling and depict it with as few people as possible? Simply screw a grey filter onto your lens and expose until the moving people ‘disappear’ from the picture. However, this effect only works if the people are moving. Unfortunately, this is no longer quite so easy these days, as the selfie trend and Instagram mean that many people often stand still.

f/11 | 20 s | ISO 100 | 105 mm | ND 1000